Thursday, February 21, 2013

DIY Bird Feeders

Since winter always means slim pickings for wild birds, I thought it would be nice if the boys made a bird feeder to help the little hungry guys out. It's an easy and fun project. The best part is, the boys can watch the birds appreciate their efforts and they can learn a little about the joy of helping others. :)

You will need:

Empty milk carton, washed and dried
Bird seed
Stick
Ribbon
Scissors

Optional:
Paint


The first fun part of this project is going out and getting a stick!

As you can see, Archer had a lot of fun looking for the stick!
Next, have your little ones paint the milk carton. Mine were too inpatient to wait for me to cover the carton with white paper first. Covering it with paper first makes the paint job look better, but, it does make it less weather resistant. (Once the first rainfall comes, the paper will fall off, but the carton itself will be fine.)


Cut a small hole in the side of the carton and shove the stick in there. Cut a small exit hole on the other side of the carton and shove the stick through that. Make sure the hole you cut is smaller than the stick. This way the stick will be secure and won't fall out. Cut two small holes on the top and the carton and loop a length of ribbon through. Tie a secure knot.


Cut small holes next to the stick. Don't cut them too big or the seed will fall out!!


Stick a funnel into the spout of the carton and pour birdseed in. If you'e having the kids help with this part, please do this on a hard surface; do not do this on a rug or carpet. No matter how careful you are, some seeds will fall on the floor.

A lot of birdseed fell in our case!!!

Hang your bird feeder outside and wait for the animals to come!!

Okay, so this is not a bird, but, a hungry woodland creature is a hungry woodland creature. :)
Enjoy!!


Wednesday, February 6, 2013

DIY Scratch Off Valentines

In a couple of weeks, Archer will be at his first Valentine's Day party, thrown by his preschool; and of course, no Valentine's Day party would be complete without Valentine's Day cards. No surprise here, Archer selected a box of Angry Birds Valentine's to hand out to his classmates.

I thought, however, it might be nice if Archer made a card for his teacher. To make it a little different, we hid Archer's message to her behind a scratch off.

To make your own scratch off, you'll need:

liquid dish washing soap
paint


Yup, that's it - 2 things. It's a pretty simple and fun idea, and I'm pretty you have at least one of things items on hand. :)

Mix two parts paint with one part soap. Gently mix, if you mix too hard, your paint will be full of air bubbles.


Archer's Valentine with his message to Ms Miller.
Paint over the desired area. You will need to give it two or three coats.


I made a tester as well.


After painting over the message a couple times, it became clear that the paint Archer chose was not opaque enough. Learn from my mistake, don't try to paint over black marker with neon green!!

So, I painted over the green with silver paint, which wasn't a bad thing. It looks more like traditional scratch off cards.

Archer's message is successfully covered!!
I covered the test message with silver paint as well. Once it dried, we scratched it off...it worked!!


Obviously, this scratch off paint can be applied to more than just Valentine's Day cards. Use it for birthday cards, party invites, save the date cards, etc!!


Enjoy!

Tuesday, January 29, 2013

DIY - Temporary Tattoos

I haven't met one kid who doesn't love temporary tattoos. Here's an easy way for you and your kids to make temp tattoos at home.

You'll need:

Cloth
Gel ink pen
Parchment, (or tracing), paper

Optional:

Picture to trace from
Add caption
Of course, the boys wanted an Angry Birds tattoo, so I used an old page from Archer's Angry Birds page a day calender. All my artistic friends out there feel free to draw your tattoos free hand! :)

Cut out a piece of parchment paper and tape it over the picture. Use the gel ink pen to trace over the picture. Use bold lines, it'll transfer better.


DIY Temporary Tattoos!!

Aren't they cute?!

Wet the cloth with warm water. Place the tattoo face down on the skin. Making sure the tattoo doesn't move, gently pat it with the wet cloth for 30 seconds.

The picture will be a mirror image, a good thing to keep in mind if you will be using words.

And voila!!


Remember I said to be careful not to move the tattoo while patting it down?

I was speaking from experience. Luckily, there was still enough ink left on the temporary tattoo to try it again on the other arm. But, if I had done it correctly the first time, the final tattoo would have been darker. Learn from my mistake, these tattoos are much more sensitive to movement than the ones you buy from the store.
I know we've all heard rumors of how people can get ink poisoning from writing on your skin. That's actually an urban myth, click on the below links for more info.

Ink Poisoning: MedlinePlus
eHow Health
LiveStrong

Have fun with this one, enjoy!!!

Friday, January 25, 2013

DIY - Fingerpaint

So, here we are, "enjoying" our first snowfall of the year. As we recently moved, the majority of our toys and arts & crafts items are still packedaway; I needed an activity to keep the boys busy and my sanity intact. I rummaged through my drawers and cabinets to find items I could use to make a quick and easy project.

DIY fingerpaint is great! You probably already have everything you need to make it, the kids love making it, and then they love playing with it.

Here's what you need to get started:

3 tbsp sugar
1/2 tsp salt
1/2 cup cornstarch
2 cups water
food coloring


Combine the sugar, salt, cornstarch, and water in a small saucepan.

Even my younger boy got excited about making the paint!
Over medium high heat, warm mixture until is thickens. Give it a good whisk every now and then.


After a few minutes, you'll be left with a thick, clear paste. Remove pan from heat and allow it to cool.

I made my paint thicker than normal, this way, if the container is knocked over, the paint won't come spilling out. If you want your paint the traditional consistency, remove your pan before it thickens too much. Remember, your paint will continue to thicken as it cools.

Portion your paint into small bowls, jars, etc and add your favorite food coloring. Mix evenly and paint!! We didn't use all the paint we made, so I put in an old glass jar and will save it for another day.


Enjoy!


Monday, January 14, 2013

"Angry Birds" Toothpaste

Is it okay to lie to your kids? Probably not. But if your kid is crying because he doesn't like the new toothpaste you bought him and you want him to go to bed so you can finally sit down...maybe it's not so bad to stretch the truth sometimes. :)

Apparently, Thomas the Engine is good enough for Archer to watch, but not good enough for him to brush his teeth with. No amount of begging or negotiation on our part could get Archer to brush his teeth, or even calm him down. How dare we replace his old toothpaste with this impostor one!

Well, hubby came up with a great idea. If you've read a couple of my past blog entries, you know Archer is fascinated with Angry Birds. Hubby took an old Angry Bird coloring book and cut out strips from the back cover. He taped the strips to the offending toothpaste tube and voila! Angry Birds toothpaste, and, more importantly, one very happy little boy.

From time to time, Thomas' eyes peek out from the Angry Birds strips. Archer, without getting angry or upset, calmly asks us to fix his toothpaste for him.

I doubt any parents out there are going to get into the bind we did over toothpaste, but the same principal can be applied to different scenarios. As I like to say, "We do what we can with what we have".   :)

Offending Toothpaste
Redeeming strips cut from an Angry Birds coloring book.
Toothpaste deemed worthy by Archer.


Enjoy!

Wednesday, December 19, 2012

The $25 Quick & Easy Reupholster


Many years ago, B.K., (that's Before Kids), hubby and I bought a cute little dinette set for our condo. I loved the simple, yet elegant lines of the chairs, and the light beige of the seats that went with just about any color theme I had picked for my dining room.

Of course, now I have two very sticky fingered little boys and my light beige fabric was definitely beginning to show it's age. It didn't make sense to buy a new dinette set and I certainly didn't have the money to have the chairs professionally reupholstered. What's a gal to do but go to her local fabric store, keep her fingers crossed and hope for the best?

With one of my best friends and the unscrewed chair bottom in tow, I checked out JoAnn Fabrics' offerings. I was immediately drawn to a beautiful paisley patterned cloth. But the $54.99/yard sticker price had me running to the clearance section!!! There, my friend found dark gray fabric that was perfect for masking accidental spills, and with it's $8/yd price, it was perfect for my budget.

The staff at JoAnn's were really helpful. They patiently explained which type of cloth would be best suited for my project; and since I brought the seat with me, they were able to tell me exactly how much fabric I needed. If you're a novice at fabrics, I highly recommend this store.

Cost:
1.5 yds of fabric (for 4 chairs)................$12
Heavy duty staple gun............................$10
Heavy duty staples.................................$2.25

The staple gun and staples originally cost $20 and $4.50, respectively; but, while we were in line, my friend downloaded JoAnn's mobile app and I got those two items at 50% off. Moral of this story, don't forget to bring your smartphone when you're out shopping!!

Below are the steps we took to reupholster the chairs:

You'll need, of course, your fabric, staple gun, and staples. I used 1.5 yds, but, be sure to measure your seats prior to purchase. I included how much I used to provide you with an estimate.


Next step, unscrew those seat cushions!!


Now lay the right side of the fabric facing down on the floor. Position your seat as show below. It order to keep this project easy for a newbie like me, we kept the old fabric on the cushions. Make sure your old cushions are clean. Stains, obviously, are okay. :)

If you're using a patterned fabric, please remember to have your designs all facing the same direction!!
Staple each side down as shown below. After you've down this, you'll be able to finish stapling each side down without worrying about your seat moving off of the center of the cloth.


After you've stapled down the side, pull the corners tightly back and staple them down.


Repeat this process with the other 3 corners.


And voila!

Sorry, couldn't rotate this pic!!
Here's a side by side comparison of the old and new fabric.


New life breathed into my old dinette set, and for just under $25.


Please check out my very talented friend's website. I think you'll like it.

http://silverlilymoon.com/

Enjoy!

Sunday, November 18, 2012

DIY Snow Globes


Looking for a fun way to spend a lazy afternoon in with the kids? Looking for an easy Christmas project?Make snow globes!

You'll need:

Epoxy glue
Glass jars
Glitter
Glycerin (or baby oil)
Distilled water
Plastic or ceramic figurines
Sandpaper

Optional:
Glasses


You can find glass jars at your local craft store or recycle old glass food jars. I used an old spaghetti sauce jar and an old jam jar. If you go the recycle route, you'll have to first clean and remove the labels from the jars.

To remove the labels, put the jars in a pot of water and dishing soap and bring to a boil.


Once the water boils, remove it from the heat and wait until the water cools enough for you to handle the jar. At that point, use a stiff bristle brush to scrub away the label, glue, and the "best by date" stamp.

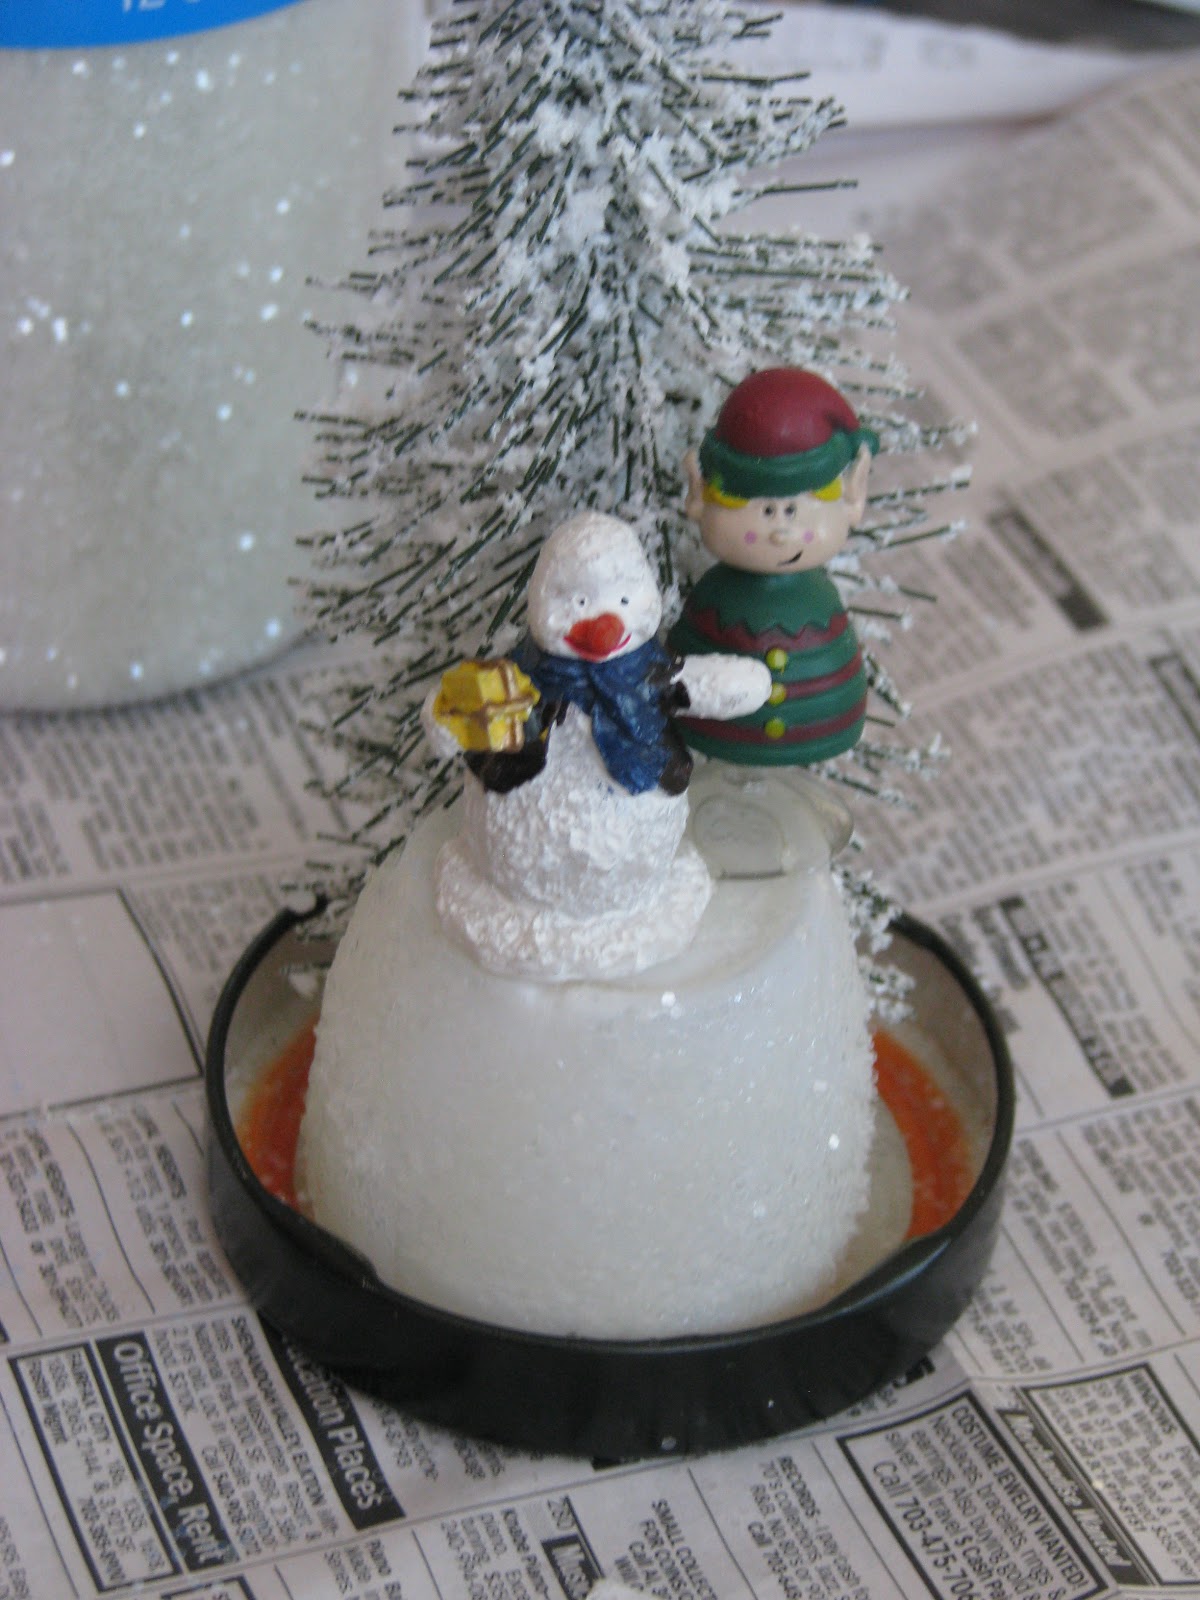
Using sandpaper, scratch the inside of your jar's lid and glue your figurines there. Make sure you purchase the quick drying epoxy glue or it may take hours for the glue to dry. I got mine from AC Moore, and using the 55% off coupon I found in the paper, I got it for just under $2.50.

In order to raise up my snowman and elf, I cut the top off of Archer's plastic  Danimals  smoothie container. I glued  glitter on it and now it looks like a snow covered mound.


Alternatively, you can also glue the figurines to the bottom of your jar for a different look.

Hold the figurines in place for a minute or two to make sure it doesn't move while the glue dries.  Set bottle aside until the glue fully dries.
After 5 minutes have passed, turn the figurines upside to make sure the glue has dried.

I didn't do this, but I also suggest gently tapping the figurines. I  thought my figurines were secure, but as you'll see in  subsequent  photos, I lost my snowman!!
Fill the jar with distilled water. If you put your figurines on the lid, remember to leave enough room for them when you screw the top back on.

You can either buy distilled water from the grocery store or make your own at home. Just boil  water and let it come back down to room temperature.
Add as much glitter as you'd like and about a teaspoon of the glycerin for a small jar, more for a larger one. The glycerin will slow the fall of the glitter and make it look like it's really snowing. If you don't have glycerin lying around, you can also use baby oil. Seal the lid with the epoxy. You can also add glitter to the sides of the lid for a more dramatic effect.

As you can see, my snowman didn't make it into the jar!
You can leave your globe as is or add a base. I glued my snow globe to an old wine glass.


This project might be better suited for older children, but my 3 year did have fun choosing the figurines at the store and dumping the glitter in the jar. And of course, he had a great time shaking the snow globe and watching the "snow" fall once the project was complete. 

The great thing about this project is that you don't have to limit this to just Christmas. If you're going to a baby shower, glue a plastic baby to the lid and add plastic baby shower themed confetti to the jar. If it's for Halloween, use a spooky figurine and black glitter. If you're passionate about animals, make an animal themed one. The possibilities are endless!

Enjoy!!