Saturday, January 4, 2014

DIY Votive Candle Holders

Okay, if you're like me, you have a love/hate thing going on with Pinterest. Who knows how many hours of my life have been wasted scrolling for projects I, (if truth be told), will never get around to. It has also made me fearful of throwing away random items, such as old spaghetti sauce jar because one magical day, I will need like a dozen of them for a DIY project. And thank goodness that site made me hoarde away those old glass jars because you and I are about to give our kids the easiest project culminating in a most beautiful result.

You'll need:

Glass jar, cleaned
Glitter
Modge Podge
Ribbon


Before the kiddies can begin, you'll need to remove the label and glue from your old glass jar. For easy instructions on how to do so, click below.
 http://akagainfullyunemployed.blogspot.com/2012/11/diy-snow-globes.html

After you've cleaned and dried the jar, have your little one brush glue on the inside of the jar.


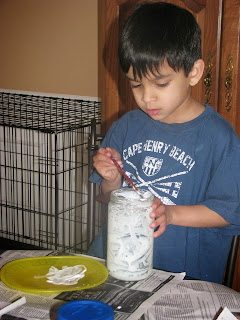
Make sure the entire inside of the jar is covered with glue.


Pour your favorite color of glitter inside the jar, screw the lid on...


...and let your little one shake, shake, shake!


Your jar will now look like this:


Yes, I'll admit, it's not very attractive. But if you used modge podge, it will dry absolutely clear. The screw threads around the mouth of the jar bother me, so, to help hide them, I tied a length of ribbon around.

With votive candles
My camera did no justice to these DIY candle holders. We put them on our dinner table when we had family over the other night and they were shocked to learn my little ones had made them. We were actually commissioned to make more!

Enjoy!

Monday, December 9, 2013

DIY Cute Snowman & Reindeer Decoration

Here's an easy and cute diy Christmas project. I must note, however, this project is probably better suited for kids who are a tad older than my preschool aged children. It' just as important to note that it's also perfect for adults who are looking for any excuse to exercise their inner child. ;)

You'll need:

Glue
Googly eyes 
Mini pots
Paint - brown, orange, red, & white
Paintbrushes 
Pipe cleaners - brown
Pompoms
Ribbon
Toothpicks


We'll be making the snowman from an upside pot, so when painting the pot white, make sure to paint the bottom. For the reindeer, the pot will the upright, so, be sure to paint the inside of the pot as well.


For the snowman, I used the toothpick to paint his coal eyes and smile. I used a small paintbrush for the carrot nose and used the toothpick to add the black details.

To make the earmuffs, cut a length of pipe cleaner and glue pompoms to the end of it. Then glue the pompoms to the snowman.

I used 2 lengths of ribbon for the scarf. The first piece wrapped and glued around the perimeter of the pot. The second I tied into a knot and glued to the first piece.


You can play around with different facial expressions. Below are a couple that my girlfriend made:

These are super cute, the pix don't do them justice!

Now for Rudolph!

Paint a small, red circle on the bottom of the pot for Rudolph's nose. Glue googly eyes at the top for, duh, his eyes.
Googly eyes make everything cuter!
Cut 2 identical lengths of pipe cleaner for Rudolph's antlers. Make them a little longer than the actual height that you want. Cut a few more smaller lengths of pipe cleaner for the tines. Twist them onto the original 2 pieces. Glue them to the inside of the pot.


Alternatively, you can cut even longer pieces of pipe cleaner and bend them into a repeating zigzag pattern.

And here's the whole gang!

For some reason, the pic shows the little guys quite grainy, but, they are super cute and would love to adorn your house for the holiday season!!

Enjoy!

Tuesday, November 5, 2013

Japanese Noodles

A few weeks ago, I invited some friends over to the house. Since I'd be busy cleaning the house while keeping an eye on my energetic little boys, I knew couldn't spend too much time or effort making lunch.

Enter this easy Japanese noodles recipe. It's perfect for causal entertaining. I made the sauce first thing in the morning, while the boys were occupied with breakfast. When my guests arrived, I simply boiled a pot pasta and added it to the sauce. Done. Easy. Loved it.

You'll need:

  • 12 ounces thin noodles
  • 1/4 cup Soy Sauce
  • 2 Tablespoons sugar
  • 4 garlic cloves, minced
  • 1 1/2 Tablespoons pure sesame oil
  • 1/4 teaspoon hot chili sauce (or more if you like, I kept it mild for the kiddies)
  • 4 Tablespoons canola oil
  • 1 Tablespoon hot water (resevered from pasta water)
  • 4 whole green onions, slice thin


Bring a pot of water to boil, add pasta and cook according to the directions on box.

Add all ingredients, (except the noodles and green onions), in a large bowl and whisk together. If you're making the sauce ahead of time, you can add the hot water to the sauce when you're ready to serve. The hot water helps to get the sauce to the right consistency.


Once the noodles are cooked, add to bowl. Add half the green onion; mix well. Sprinkle remaining green onions on top.


It's delish just like this, or...

...you can add chicken...


...or shrimp...


...or both!!


Enjoy!!

Wednesday, October 16, 2013

Honey Facial Cleanser

So, I woke up one morning and felt I was transported back to my teenage years. As I looked at my face in the bathroom mirror, I was horrified to discover that during the night, my face had broken out. I'm mortified just sitting here typing about it.

I jump onto Google to try to find a solution. I was repeatedly asked, by the articles, for my face type. Oily? Normal? Dry? Combination? I didn't know, my face didn't come with any labels!! All I knew was that I had a very specific problem that needed to be taken care of yesterday.

I found an assortment of strange homemade remedies that used a wide range ingredients such as toothpaste, witch's hazel, lanolin, and dried hibiscus. I didn't want to drive all over the DC Metro area looking for items on a pimple inspired scavenger hunt.

Okay, okay, I did, (and still do) have toothpaste on hand on a daily basis. I just wasn't crazy about simply addressing the issue after it erupted on my face. I wanted to stop this nonsense from ever happening again.

In my continued research, I stumbled across a site that sang the praises of the honey mask. It was gentle and effective enough so it didn't matter what type of face you had. And it only had one ingredient.  Simple...I loved it.

Honey is the natural choice to clean your face:

  • It is antibacterial and anti-fungal, meaning it will disinfect your skin and help bring you back to your beautiful, glorious self.
  • It helps detoxify by soaking up impurities.
  • It posses antioxidants, which can help protect/repair your skin from sun damage.
  • It contains bee pollen, propolis and beeswax - think exfoliate! 
  • It leaves your face feeling incredibly soft!
When selecting your honey, please be sure to pick up raw honey. The honey at the grocery store has been filtered, heated to temperatures high enough to loose it's beneficial nutrients & enzymes, and/or is watered down. 

Also, a lot of the grocery store honey does not have any pollen in it. This honey has been ultra-filtered to remove any of these identifying markers. Pollen is the only fool-proof way to determine where exactly the honey came from. According to foodsafteynews.com, "It is a spin-off of a technique refined by <countries> who have illegally dumped tons of their honey - some containing illegal antibiotics - on the U.S. market for years. 

Not exactly stuff I want all over my face. (Or in my body for that matter!!)

For this remarkable Honey Facial Cleanser, you'll need:

Your favorite raw honey and a spoon!


Scoop out about half a teaspoon.

You don't need exactly half a teaspoon, just enough to cover your face.

Please make sure to tie your hair back before applying the honey. Needless to say, it is very sticky!! 

Put the honey in the palm of your hand and mix it with your finger for a few seconds. The honey will become lighter in color and will spread more easily on your face. 

Spread the honey all over your face, be sure to massage that honey goodness in!!

Leave it on your face for 10-15 minutes. (You can wash it off immediately, but, I recommend leaving it on for a few minutes.)

Rinse and enjoy!

Try this honey cleanser once a day for two weeks. I wasn't brave enough to post a before & after picture, but, if you are, send them my way. I'd love to post on the site!!


Saturday, August 3, 2013

Energetic Body Scrub

If you know me, you know this, I love coffee. Throw in a little French Vanilla, and I'm in Heaven.

So, when I came across a diy coffee scrub, I had to try it. After using the scrub, I found I had immediate results. I was afraid I had some sort of positive placebo effect going on in my mind, but hubby confirmed that I now posses smoother skin. :)

You'll need:

3 tablespoons brewed coffee grounds
1 tablespoon salt


Brew 2 cups of coffee using 3 tablespoons of your favorite coffee. Once the coffee is brewed, dump the grounds into a bowl. Add 1 tablespoon salt. Mix.

Use these grounds within 20 minutes of brewing coffee. After that, oxidation sets in, essentially meaning the grounds have gone stale. 
Hop in the shower, rub all over, and rinse.

Make sure you have a mesh net over the drain to catch all the grounds. 


Coffee grounds have magnesium, vitamin E, and  have antibacterial properties. In addition to all these perks, you also have a cup of coffee waiting for you when you hop out of the shower.

Enjoy!

Wednesday, July 31, 2013

Colorful, Fun Bread!!

Here's a fun twist to an immortal, albeit, a sometime boring staple. Grab a bread recipe, a couple bottles of food coloring, and your favorite little helper to make some colorful treats. 

First, prepare your favorite Italian or French dough as the recipe dictates. If you don't have a favorite recipe, here's a link to quite a few: http://allrecipes.com/recipes/bread/

After you prepare the dough, let it rest for at least a hour.
After the dough has risen, divide the dough into equal parts. The number of balls depend on how many colors you want to work with. 
 

Place one ball on a slightly floured mat and set the rest aside. Add a few drops of coloring. 


Knead the coloring into the dough until the color is evenly spread.

It'll take about 5 min of kneading. Most of that 5 min, the dough will look like this.
Hang in there. Eventually, the dough will look like this.

Repeat this process with the remaining balls of dough.


Now it's time to call your little one. Have them roll out each ball of dough.

Roll out to the size of your baking pan.

Brush a thin layer of water on top of the dough. 
Place dough strip in baking pan. Repeat process with remaining pieces of dough, firmly placing each color on top of the previous one.
Here's an example of another bread Archer and I worked on together. Here he rolled little pieces of dough and put in this small cake mold. We skipped the layer of water in this one. The water layer helps keep the different layers of dough together to prevent air holes. Press the dough in tightly and you should be fine.
Allow your dough to rest again for at least a hour then bake in oven as directed by your recipe. When the top is golden brown (though that's a little hard to see when working with colored bread), and the bottom sounds hollow when tapped on, it is done.


Here it is cut open, just beautiful!


The kids loved eating their colorful sandwiches and buttered toasts. I have to say, at times I felt as if I was going to bite down into a lovely piece of colored white cake, but, rest assured, the food coloring will not change the flavor of your bread.


This activity does take a little more time than others, but both my little ones loved helping me make the bread dough, and then rolling and shaping the dough into the molds. Plus it gets them acclimated to cooking at an early age, which is very important. :) 

(Oh, and did a fail to mention, you get lots of yummy bread at the end.)  :D

Enjoy!!

Tuesday, May 14, 2013

A Fun Fix for a Missing Zipper Pull Tab

Poor Alexander. Being the second baby means means not getting the same one-on-one attention that big brother did as a baby. It also means trying to play keep up with Archer and wearing lots of hand-me downs. Since Archer had such an extensive wardrobe as baby/toddler, I haven't had much need to buy Alexander new clothes.

On a recent rare occasion when I did buy Alexander a new hoodie, I felt like the universe was telling me I should just stick to the hand-me downs. Why? Well, when I got home, I noticed that the pull tab for the zipper was missing. Sure, I could have driven back to the store to get a replacement, but it was some distance from my house and I really didn't feel like doing that.

Instead, I drove to my local Michael's, with 40% coupon in hand, and bought a little motorcycle charm. (Archer loves all things automotive.) Using two pliers, I pinched the metal link that came with the charm around the crown, (tab holder), of the zipper.

It's a little hard to see, but, here's a pic of the charm and hoodie.

Also a little hard to see, but here is the new and improved hoodie.
I honestly think that the hoodie with the charm zipper is an improvement over the original because it personalized it based on Alexander's love of motorcycles. I love this idea and think I may "loose" other zipper pulls, just so I can personalize other items with more meaningful charms. I think your little ones will really like this one!

Enjoy!